
The dreaded Before shot. The contents of my desk were all over the floor while my desk was getting a face lift.
Here's how I put the room together with almost no money:
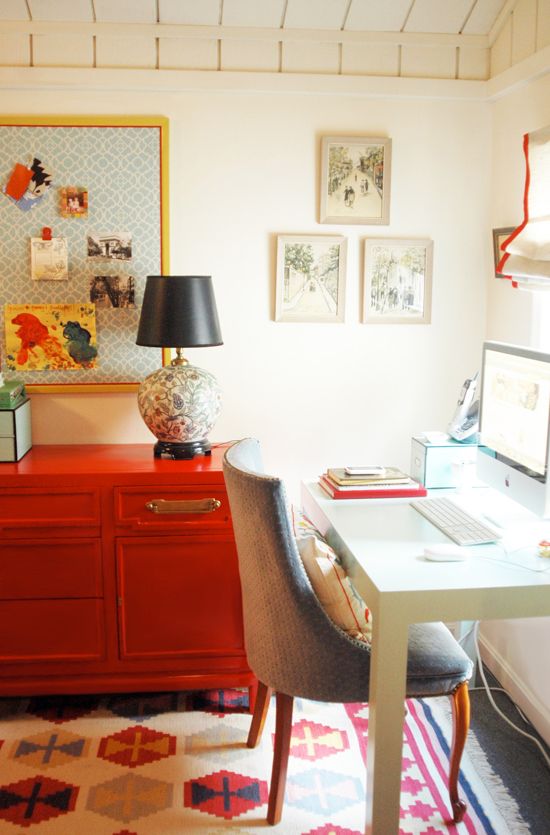
1. Revamped Parsons Desk
I bought a vintage Parsons desk on Craigslist a year or two ago for almost nothing. This is after I sanded it.

I had painted it a fun green color, but now I wanted a sort of dingy pale aqua color, similar to Martha Stewart for Valspar "Vintage Map." Since the desk is pretty small, I decided to save money on paint and mixed my own color using some glossy white latex and a little bit of turquoise and brown acrylic craft paint.

I rolled on the paint with a mini-roller and did about three coats. After letting the last coat dry overnight, I used my favorite product - Wipe On Poly. Yes, it's as easy and awesome as it sounds. Polyurethane sealer that you wipe on.
 Action shots!!

Two good coats of Wipe-on in "Gloss" and 24 hours of curing time and the Parsons desk looked as good as new.
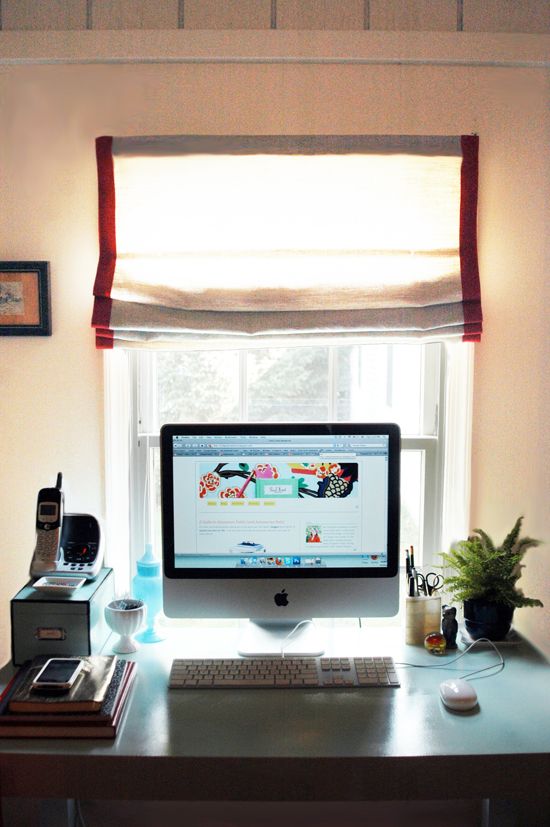
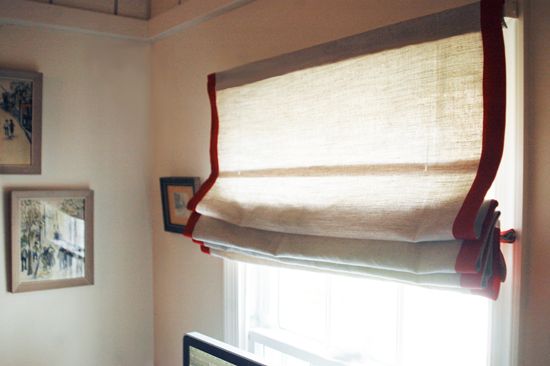
2. DIY Fabric Shade
I used about a yard and a half of linen from my stash and a roll of 1.5" red grosgrain to make a fabric shade for the window. It still needs to be lined, but it's not bad for a $0 project. Here are the instructions for making your own.
3. New (old) RED Credenza.

After reading this post from Nick Olsen a while back, I picked up a couple cans of Rustoleum's 'Saftey Red' Spray Enamel at Home Depot for a client's project. We ended up going with a different color scheme, but I kept the spray paint. And I'm so glad I was able to use it on this project! Isn't it a fun color? The perfect orange-red.

Since I know you will ask -- I did prime the credenza first. Well. Part of the credenza - just the top since that's the part that gets the most wear.

I rolled on my trusty Zinsser and let it dry while I worked some magic on the dingy brass hardware with white vinegar and salt.

Here's how I put the room together with almost no money:
1. Revamped Parsons Desk
I bought a vintage Parsons desk on Craigslist a year or two ago for almost nothing. This is after I sanded it.

I had painted it a fun green color, but now I wanted a sort of dingy pale aqua color, similar to Martha Stewart for Valspar "Vintage Map." Since the desk is pretty small, I decided to save money on paint and mixed my own color using some glossy white latex and a little bit of turquoise and brown acrylic craft paint.

I rolled on the paint with a mini-roller and did about three coats. After letting the last coat dry overnight, I used my favorite product - Wipe On Poly. Yes, it's as easy and awesome as it sounds. Polyurethane sealer that you wipe on.
 Action shots!!
Two good coats of Wipe-on in "Gloss" and 24 hours of curing time and the Parsons desk looked as good as new.
2. DIY Fabric Shade
I used about a yard and a half of linen from my stash and a roll of 1.5" red grosgrain to make a fabric shade for the window. It still needs to be lined, but it's not bad for a $0 project. Here are the instructions for making your own.
3. New (old) RED Credenza.

After reading this post from Nick Olsen a while back, I picked up a couple cans of Rustoleum's 'Saftey Red' Spray Enamel at Home Depot for a client's project. We ended up going with a different color scheme, but I kept the spray paint. And I'm so glad I was able to use it on this project! Isn't it a fun color? The perfect orange-red.

Since I know you will ask -- I did prime the credenza first. Well. Part of the credenza - just the top since that's the part that gets the most wear.

I rolled on my trusty Zinsser and let it dry while I worked some magic on the dingy brass hardware with white vinegar and salt.

The credenza ended up needing two or three coats of the spray enamel. Because I invested $2.95 in this reusable spray painting nozzle/trigger/thing, my pointer finger and I are still on speaking terms. AND the paint job looks professionally sprayed.
 The freshly painted credenza got two coats of Wipe-On Poly as well and it was done. I love the way the cleaned up brass hardware looks against the orangey red!
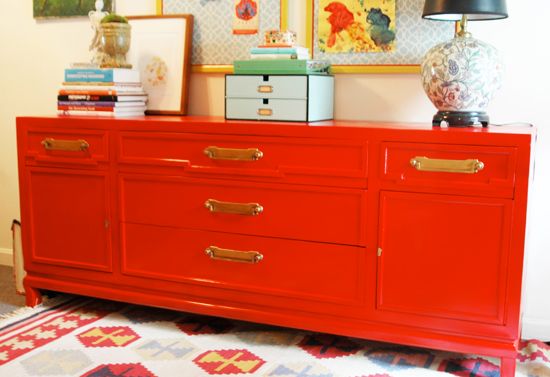
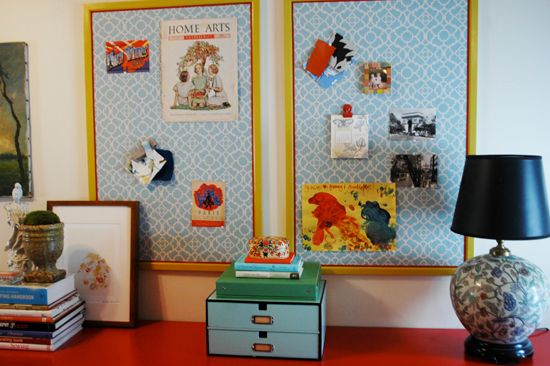
4. Pretty Inspiration Boards
I picked up a pair of very cheap cork boards and painted the frames with that same yellow paint that I used in my girls room (Martha Stewart "Olive Oil"). No need to tape or to be careful with the paint job here since the cork will be covered up.

I measured and cut up some old fabric that I bought for a project and never used (--Are you picking up on a theme here??) and simply ran a line of fabric glue around the border of the cork board. I glued one edge at a time and smoothed like crazy so that the fabric would lay perfectly flat. (PS the fabric is an outdoor print made by Waverly, called "Lovely Lattice" in Lagoon)


I hung up the refinished cork boards about five minutes before taking pictures, so I haven't had a chance to really style them yet with inspiration stuff, but that can be a fun ongoing project.
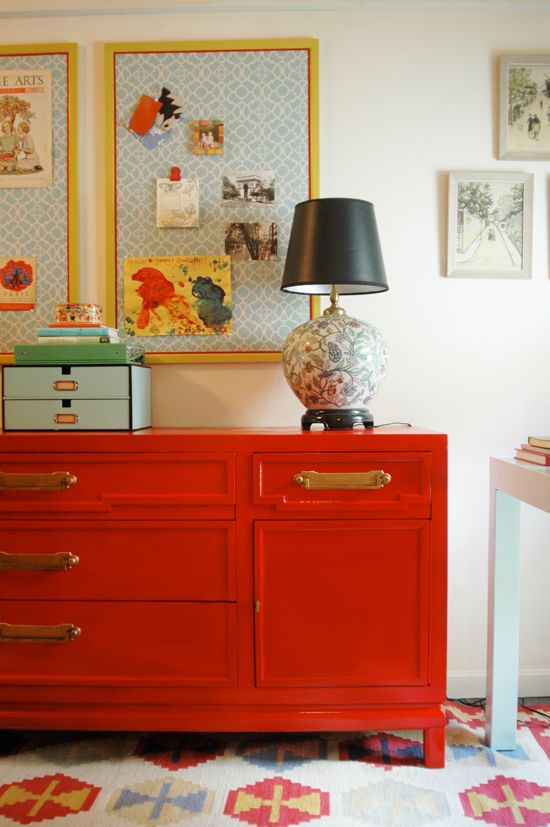
The rest of the room was put together with stuff I already had. An IKEA rug, an eBay lamp, some prints from a vintage shop, etc.

And that's it for my (basically) $0 office redo! I've got some sort of cold/flu situation happening, so I think I'm going to call it weekend. See you back here Monday?
xoxo, Jenny
0 comments:
Post a Comment